Three Alternatives to an ND Filter for Long Exposures
Long exposures are a staple of photography - who doesn’t love a shot of silky smooth water? These images are usually taken with the help of a neutral density, ND, filter that darkens the scene and allows us to leave the shutter open for much longer than we otherwise could. However, sometimes we don’t have an ND filter on hand. Luckily, that doesn’t hinder us much, as here are three ways to get that long exposure look without any filters.
Keep in mind that an ND filter will always be more convenient, provided you have a tripod. The techniques outlined below are best for matching low density NDs, like 2-4 stops. Matching a ten stop ND might require stacking hundreds of images, which in most cases isn't realistic. However, while these tricks aren't magic bullets, they are very useful workarounds that can make a big difference to your photography in situations where you simply can't use an ND.
1. Average Layers in PhotoShop
This is one of the most common tricks for getting a long exposure image without a filter, and the great thing about it is you don’t even need a tripod (though a tripod does help). Set the shutter speed as low as you can while still getting a sharp shot, and then take several images in succession. If you’re on a tripod you’ll probably be able to use a slower shutter speed, so you’ll need fewer shots. But regardless, the more shots the smoother the water.

You’ll open the images as a stack of layers in PhotoShop, and combine them into a single image. This essentially makes the apparent shutter speed equal to the shutter speed of the shots multiplied by the number of shots - so a stack of ten images at 1/20th of a second will be roughly equivalent to a single shot at half a second.
There are two different ways to average the images, you can either set all the layers but the base layer to "lighten" mode, or you can decrease layer opacity as you go up from the base layer - going to 50%, 33%, 25%, 20%, etc. (100/layer number).
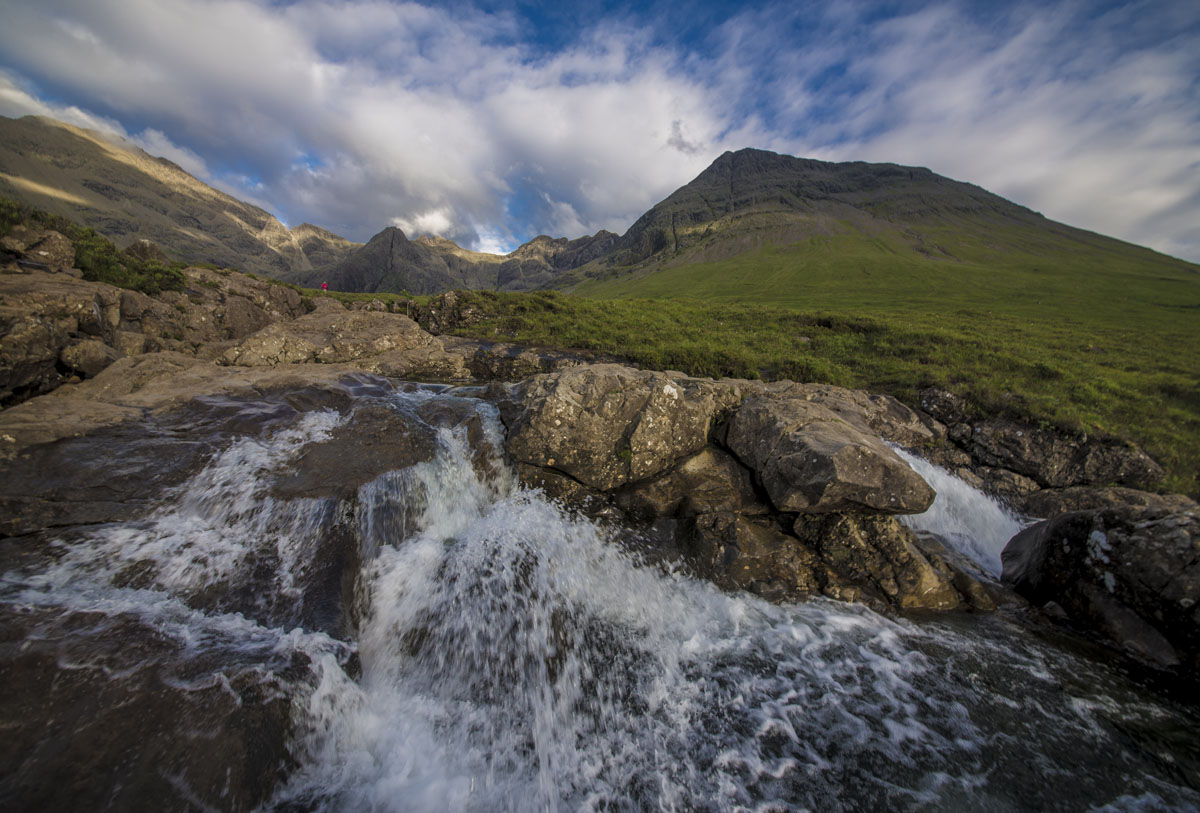
Both modes give fairly similar results when you’re using long shutter speeds, but with shorter shutter speeds they both give a different and somewhat unique appearance. With the lighten mode, you end up with a more tumultuous look, with lots of sparkle and splashing. With the decreasing opacity, you get a much smoother look, more akin to an actual long exposure. The cool thing is, you can easily do both and judge which is better for yourself. The first image in this article uses the lighten mode, whereas the image below uses the decreasing opacity mode.
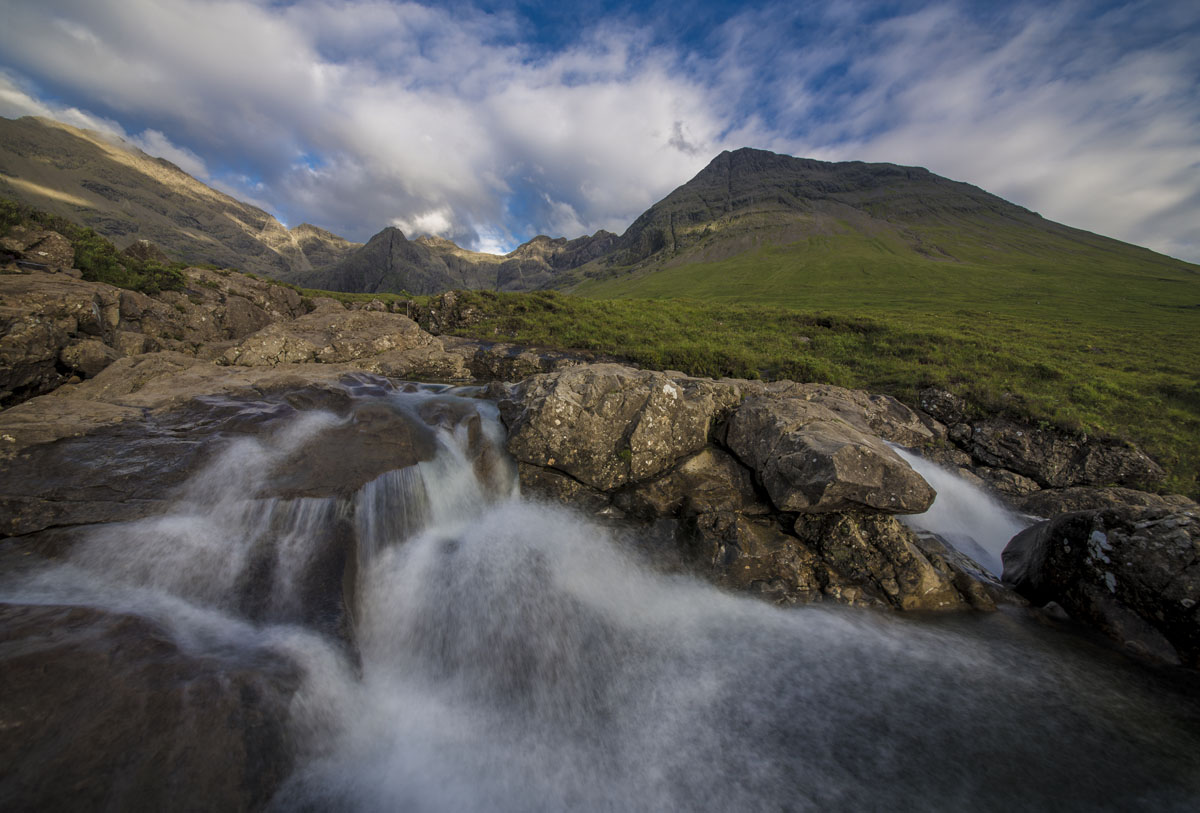
With both images I masked out parts of the image that weren't moving - only the water, and a person in the scene were stacked. This way the landscape remains as sharp as possible, since the shots were taken handheld and can't be aligned 100% perfectly. Both shots above were 15 shot stacks, with each image taken at 1/100 of a second. For reference, below is a single image from the stack.
2. Use Your Camera Strap as a Graduated ND
This tip is ideal for sunrise or sunset shots of the coast, where you want the ocean to be nice and smooth but the sky is so bright that you can’t get a long enough exposure on the ocean. Usually you’d use a graduated ND filter for this, where the top half is dark and the bottom half clear. You could also take two shots and merge them in PhotoShop as an HDR. But an even more fun way to do it is to use your camera strap as a graduated ND filter.
With the camera on a tripod, position your camera strap in front of the top half of the lens so that you’re blocking the sky but not the ocean. Then click the shutter button to start the exposure, exposed for the water. A few seconds in, as you near the end of the exposure, lift the camera strap to expose the sky. This gives you a long exposure of the water, and a short exposure of the sky, all in one shot. Sometimes it may take a little trial and error, but it’s a fun trick. I’ve actually used it before, in the photo below.

3. Merge Two Shots at Different Apertures
If you want to shoot the scene at say f5.6 or f8 for optimal sharpness, but also want a long exposure, you can easily mix two shots together to achieve your goal. (Note that this works best on a tripod). Take your first shot at the optimal aperture, and then stop down as far as your lens goes and increase the shutter speed accordingly. Then take that longer exposure shot, and later you can simply mask the water from the stopped down shot into the other image. Diffraction blur isn’t a big deal in the water, since it’s mostly blurred anyway, and this way you get the best of both worlds.
Finally, you can mix and match these techniques. Sometimes doing all three might even be necessary to get the look you want, but I expect that’s pretty uncommon. But merging several stopped down shots to get super smooth water, and then merging a shot taken at a wider aperture for the rest of the scene isn’t a bad idea.
Of course, if you do lots of long exposure work it probably makes sense to just keep a good ND filter in your bag at all times. You never know when you’ll have to improvise though, so don’t forget that it’s not the end of the world if something happens to the filters!
Get the free guide to learning photography faster by signing up to the email list here!
Lauchlan Toal is the creator of UnlockCreativePhotography.com, and a Halifax based food photographer. Outside of food photography, he enjoys most genres, finding fun in any kind of photography challenge.